Aim - Make the user interface dynamic or user specific. For example user [weblogic] wants to see the background of front end in default blue color while user Mike wants to see it in green color. Let us see how we can achieve this step by step.


Create a folder say CUSTOM_UI. You need to copy the following folders and paste them to CUSTOM_UI.
1) Folder s_blafp from C:\OBIEE11g\Oracle_BI1\bifoundation\web\app\res
2) Folder sk_blafp from C:\OBIEE11g\Oracle_BI1\bifoundation\web\app\res
3) Folder WEB-INF from C:\OBIEE11g\instances\instance1\bifoundation\OracleBIPresentationServicesComponent\coreapplication_obips1\analyticsRes
I have kept the folder CUSTOM_UI in OBIEE11g home directory.
Rename the folders s_blafp to s_Mike AND sk_blafp to sk_Mike.

Go to C:\OBIEE11g\CUSTOM_UI\sk_Mike\b_mozilla_4 and search for "custom.css"
Change the background color of the 2 nodes:
->.HTMLBody{font-family:Tahoma,sans-serif;font-size:11px;background-color:#336600!important;overflow:auto;margin:0;padding-left:5px;}
->.HeaderContainer{background-color:#336600;font:11px Tahoma;position:relative;}
Save the changes.
Now login to weblogic console. Press Lock & Edit. Go to deployment and press Install as shown in the snapshot below.

Select the CUSTOM_UI folder using the Browse button and follow the instructions as shown below.

Now just go to tab Target and verify if the AdminServer has been selected.

Click on Save. Now Click on Activate Changes.
Once it is done - Go to Deployment option and search for our newly deployed application CUSTOM_UI.
Have a look at its state. It will be in "Prepared" state - >

Select the application CUSTOM_UI and press Start [ Servicing All Requests ]
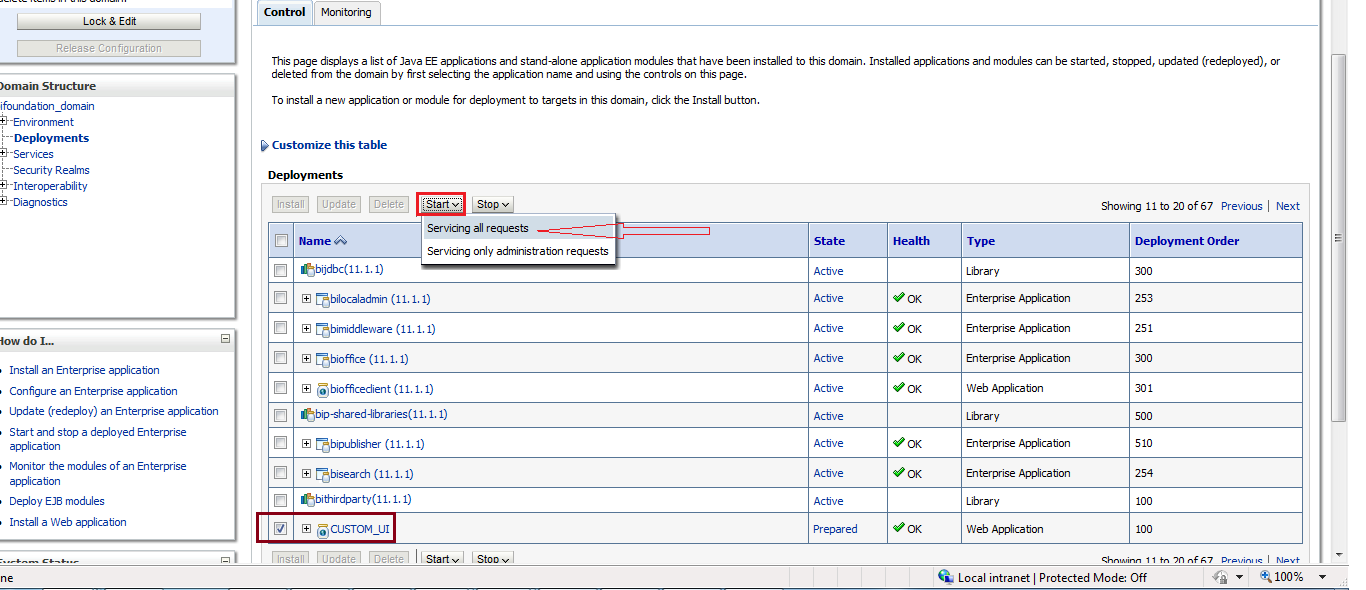

You will now see its status being changed to Active.
Now we are going to create a database table with 3 columns -- Username , UserStyle and UserSkin.
Have a look :

Note that the default style and skin of user weblogic is "blafp" and we have created a new
style and skin named "Mike" for user Mike.
IMPORT THIS table to OBIEE repository.
Create a SESSION INITIALIZATION BLOCK as shown below.
BLOCK SQL : SELECT USER_STYLE, USER_SKIN FROM USER_SKIN_STYLE
WHERE upper(USERNAME)=upper(':USER')
Note : While Creating a variable SKIN - a message will pop up asking if you want to overwrite system variable SKIN. In that case - Say YES.

Save the changes.
Add the below tags to instanceconfig.xml
<URL>
<CustomerResourcePhysicalPath>C:\OBIEE11g\CUSTOM_UI</CustomerResourcePhysicalPath>
<!-- CustomerResourcePhysicalPath is a tag that specifies the actual target directory name -->
<CustomerResourceVirtualPath>/CUSTOM_UI</CustomerResourceVirtualPath>
<!-- CustomerResourceVirtualPath provides the URLPrefix that will be added for sourcing all the files -->
<!-- If we donメt give this tag, BI EE will automatically add analyticsRes (System target directory) -->
</URL>
<UI>
<DefaultStyle>Mike</DefaultStyle>
<!-- Without the S_ -->
<DefaultSkin>Mike</DefaultSkin>
<!-- Without the SK_ -->
</UI>

RESTART THE BI SERVICES.
Once the login page comes up :
1] Login with weblogic
Note that user weblogic can see the blue background ( default skin : blafp )

Now log out .
2] Login with Mike.
Note that user Mike can see green background. ( Custom Skin : Mike )

Note : Changing the background color was just an example. You can actually change the images,texts and so on. So just play around with that CSS stuff.
Thank you and wish you all the best.
1 comment:
nice one..- Sandeep Venu
Post a Comment